Sunday, December 23, 2012

Merry Minis Christmas Card


MERRY CHRISTMAS TO ALL OF YOU!  Just wanted to share my simple and sweet Christmas card this year!  I used our White Notecards; the 1-3/8" Square Punch; the 1" Square Punch; the Postage Stamp Punch; the Merry Minis Punch Pack; Stampin' Dimensionals; Open Sleigh; Merry Minis; Cherry Cobbler ink; and a Pearl Jewel.  Simple, sweet, and one of my favorite Christmas cards ever!  May you all have a fabulous Christmas and a New Year filled with all good things - and lots of stamping!

Wednesday, December 19, 2012

Retired Serif Essentials Bigz Alphabet Die on Sale


My favorite accessory or tool is the Big Shot because you can do so many things with it - FUN THINGS!  One of my favorite dies was the Serif Essentials Bigz Alphabet Die - nice, big letters that you can do so many things with.  It was originally $149.95 and it's currently on sale for $59.99.  I used the Serif Essentials Bigz Alphabet Die, along with our Red Glimmer Paper (121790) to create this cute "Ho Ho Ho" above my fireplace!  For New Year's, I'll be using the Champagne Glimmer Paper (127885) to die cut "Cheers" for my fireplace!  I'll also put "Love" up there for February - and you know I'll be putting "Boo" up there for Halloween!  If you'd like to purchase the Serif Essentials Bigz Alphabet Die, you'd better hurry - it's only available while supplies last!  Just visit www.pennythomas.stampinup.net and click on "Shop Now," which is the small, white rectangular box below my name.  Then click on "Clearance Rack Blitz," and then click on "Tools and Die Cutting."  The dies are so easy to do and the results are stunning!  I think it's a great Christmas present for yourself or for a Big Shot lover in your life!  MERRY CHRISTMAS!

Wednesday, December 5, 2012

Happy Hour Christmas Card


This is a card I offered at my Jolly Jingle Christmas Card Workshop.  I saw a card very similar to the "Noel" card above and had to make it with the supplies I had on hand.  I absolutely loved it, but found it quite tedious to stamp out the "Noel," so I offered an alternative idea with the candy canes and "Merry."  What you can't see in the photo is the glitter all over the Lacy Brocade embossed panel.  It is beautiful in person and one of my favorite Christmas cards EVER!  With added bling from the rhinestones, THIS CARD ROCKS!

Recipe:

Paper:  Whisper White - 8-1/2 X 5-1/2; Whisper White - 3-3/4 X 2-3/4; Whisper White - 3-1/2 X 2-1/2; Whisper White scrap
Stamps:  Loving Thoughts (for the "Noel"); Tiny Tags; Happy Hour
Inks:  Cherry Cobbler
Miscellaneous:  Stampin' Dimensionals; Lacy Brocade Embossing Folder; Big Shot Machine; Cherry Cobbler Baker's Twine - 14" long; Scissors; Jewelry Tag Punch; Rhinestone Jewels; Paper Snips

Happy Hour Christmas Card


This is a card I offered at my Jolly Jingle Christmas Card Workshop.  We had lots of fun with it!  Is that a margarita or a martini?  Some of the gals took the rhinestone jewel, colored it with a Red Sharpie, and moved it up to be the berry with the holly.  It was adorable and sparkly!  Not sure who to give credit to for this card.  If you know, let me know, and I'll be happy to post the designer's name.

Recipe:

Paper:  Whisper White - 8-1/2 X 5-1/2; Gumball Green - 5-1/2 X 1; Whisper White - 3-1/4 X 3/4"; Red Glimmer Paper scrap; Whisper White - 4 X 2-3/4
Stamps:  Happy Hour
Inks:  Cherry Cobbler; Gumball Green
Miscellaneous:  SNAIL Adhesive; Paper Piercer with Mat; Paper Snips; Rhinestone Jewels; Circles #2 Originals Die; Big Shot Machine; Stampin' Dimensionals; Sticky Strip; 1-/4" Circle Punch; Stamp-a-ma-jig; Gumball Green Stitched Satin Ribbon - 11" long; Mini Glue Dots

Snowflake Soiree Card


This is a card I offered at my Jolly Jingle Christmas Card Workshop.  WOW!  This ended up being everyone's favorite.  Studded with pearls and a Vintage Faceted Button - along with the gold embossing - it's a stunning card!  This is a Mary Fish card! 

Recipe:

Paper:  Very Vanilla - 11 X 4-1/4; Brushed Gold - 4-1/4 X 2-1/2; Very Vanilla - 4-3/4 X 3-1/2
Stamps:  Snowflake Soiree
Inks:  Versamark
Miscellaneous:  SNAIL Adhesive; Vanilla Seam Binding Ribbon - 9" long; Scissors; Stampin' Dimensionals; Gold Embossing Powder; Heat Tool; Embossing Buddy; Stamp-a-ma-jig; Vintage Faceted Button; Mini Glue Dots; Vanilla Seam Binding Ribbon - 13" long; Pearl Jewls; Paper Snips

Merry Minis Punch Pack Card

 
This is another card I offered at my Jolly Jingle Christmas Card Workshop.  You just can't go wrong with a card like this.  Pictures never do a card justice.  In person, this card is just gorgeous with the sparkling tree in the center.  I don't know where I got this card idea.  If anyone knows who the originator is, please let me know and I'll be happy to give credit where it is due!
 
Recipe:
 
Paper:  Whisper White - 8-1/2 X 5-1/2; Whisper White - 4 X 2-3/4; Whisper White - 4 X 1/2"; Whisper White scrap; Silver Glimmer scrap
Stamps:  Teeny Tiny Wishes
Inks:  Cherry Cobbler
Miscellaneous:  Stampin' Dimensionals; Merry Minis Punch Pack; Rhinestone Jewels; Paper Snips; Stamp-a-ma-jig; Paper Piercer with Mat; SNAIL Adhesive; White Organza Ribbon - 5" long; Cherry Cobbler Baker's Twine - 17" long; Red Sharpie (to color the rhinestone)
 

Ornament Keepsakes Card

 
Every year I host a Jolly Jingle Christmas Card Workshop where my customers can make their Christmas cards.  It is my biggest event of the year and we have an absolute blast!  This is one of the cards I offered at the workshop.  I love how you can take the tree from "Lovely as a Tree" and make it look like a single pine bough!  This is not my card design - I ruthlessly copied it!  If anyone can tell me who originally designed this card, I'll be happy to give credit where it is due!
 
Recipe:
 
Paper:  Real Red - 11 X 4-1/4; Very Vanilla - 5-1/4 X 4; Vanilla scrap
Stamps:  Lovely as a Tree; Ornament Keepsakes; More Merry Messages
Inks:  Old Olive; Versamark; Real Red
Miscellaneous:  Stampin' Dimensionals; 2-Way Glue Pen; Dazzling Diamonds Glitter (on the tree); Cherry Cobbler Seam Binding - 10-1/2" long; Scissors; Mini Glue Dots; Gold Embossing Powder; Heat Tool; Embossing Buddy; Stamp-a-ma-jig; 3/4" Circle Punch; Pearl Jewels


Monday, November 26, 2012

Christmas Stampin' Sampler No. 2


Do you know what these little squares look like in real life?  Little shortbread cookies.  I just want to eat them!  This is one of my favorite projects ever in the 14 years that I've been a demonstrator.  Funny how something so little and simple can bring so much joy!  It's all Very Vanilla card stock and Crumb Cake ink.  I used the 1-3/8" Square Punch, the Postage Stamp Punch, and the Merry Minis Punch Pack with the Merry Minis stamp set!  This is all I needed to get in the mood for Christmas, so bring on the merry now!  I'M READY!

Monday, November 19, 2012

Christmas Stampin' Sampler


We've kind of gone sampler crazy down here in Katy, Texas!  We're having so much fun creating samplers for each holiday or season.  Funny thing is, I'm not getting tired of them at all!  If anything, I'm wanting to make more!  This is the Christmas Stampin' Sampler I offered at my last event.  It was quite an ambitious project with 25 squares, but we made it through, and everyone was thrilled with their framed 12 X 12 piece!  Five of these squares were ideas I got from members of The TOPICS!because we've been engaging in "square swaps," and the other 20 were mine.  I ended up changing some of these squares, though, because my customers were fabulous at adding more bling to the squares - and I wanted mine to have more bling, too, so this is what I finally ended up with!  LOVE IT and am so proud to hang it up during the holidays!  I'm sure I won't want to take it down once Christmas has passed!  Not to worry, though, I've got a winter sampler in the works!  Ha!  HELP ME - I'M MAKING SAMPLERS AND I CAN'T STOP!

Tuesday, October 30, 2012

Festival of Prints Christmas Coasters


Want a really quick and inexpensive Christmas gift?  This is it!  Just take a tile, brush the top with Mod Podge, place a 4 X 4 piece of Designer Series Paper on top, seal it down, and then brush it with Crystal Effects to get a shiny finish!  While it's not recommended for drinks that are wet with condensation, it's perfect for a coffee or cocoa mug!  This is an item I offered at my "Busy Little Elves" Camp Wannastamp and we had so much fun picking out our papers from the Festival of Prints Designer Series Paper Stack!  My coffee tasted more fun this morning when I got to use my tile!  Put two tiles together, wrap our Cherry Cobbler Scalloped Tulle Ribbon around them and then add a tag created from the left-over pieces of your Designer Series Paper!  The recipe is below.

Recipe:

Paper:  Festival of Prints Designer Series Paper Stack - 4 X 4; Very Vanilla scrap for the tag; Festival of Prints Designer Series Paper Stack scraps for the tag
Stamps:  Joyous Celebrations
Inks:  Cherry Cobbler; Early Espresso; Island Indigo; Lucky Limeade
Miscellaneous:  Tiles; Mod Podge; Foam Brushes; Crystal Effects; Cherry Cobbler Scalloped Tulle Ribbon - 22" long (to tie it all up nice and pretty for a gift); Scissors; 1/8" Hole Punch; SNAIL Adhesive; Small Oval Punch; Stampin' Dimensionals; Rubber Nubbies (so you don't scratch any furniture); Extra Large Tag Punch; Linen Thread - 5" long; Paper Cutter

Monday, October 29, 2012

Window Sheet Candy Containers


I got this cute idea from Jill Olsen, who had lots of wonderful samples available for us to look at while we were on the Founder's Circle trip in September.  It is made using an empty Stampin' Up! button container!  Lucky me, I've been saving those empty containers for years and now I know what I can do with them!  Don't fret, though!  If you don't have any empty button containers, I understand that you can do the exact same project using Ball jar lids to create a top and bottom.  Just place your window sheet in-between to create a see-through candy container!  LOVE IT!  The recipe is below.  All supplies used and shown are from Stampin' Up!

Recipe:

Paper:  Polka Dot Parade Designer Series Paper - 8-1/4 X 3/4" (for the top); Polka Dot Parade Designer Series Paper - -8-1/4 X 3/8" (for the bottom); Window Sheets - 8 X 3; Whisper White scrap; Real Red scrap; Old Olive scrap; Polka Dot Parade Designer Series Paper scrap (for the top circle and bottom circle)
Stamps:  Tags Til Christmas
Inks:  Real Red; Old Olive
Miscellaneous:  Plastic Button Containers; Sticky Strip; Scissors; 2-1/2" Circle Punch (for the outside circle of the top and bottom lids); Circles #2 Die (for the inside circle of the top and bottom lids); Big Shot Machine; Scallop Square Punch; 1" Square Punch; Candy; Whisper White 1/4" Sweater Trim - 23" long; SNAIL Adhesive; Stampin' Dimensionals

Make A Mitten Gift-Card Holder


Our notecards and envelopes come in pretty handy!  Instead of using them for a notecard, I used them to create a gift-card holder and a pouch!  This is an item I offered at my "Busy Little Elves" Camp Wannastamp.  It's so quick and easy!  Just seal the envelope, cut a sliver off of one edge to create a pouch, and then use your circle punch to create a notch at the top!  On the inside, glue-dot your gift card to the inside of the notecard!  CUTE!  The recipe is below.  All supplies used and shown are from Stampin' Up!

Recipe:

Paper:  White Notecards and Envelopes; Whisper White scrap for the mittens
Stamps:  Make A Mitten; Greetings of the Season
Ink:  Cherry Cobbler
Miscellaneous:  Mitten Builder Punch; Mini Glue Dots; Stampin' Dimensionals; Cherry Cobbler Baker's Twine - 3" long; Pearl Jewels; Paper Snips; Stamp-a-ma-jig; Cherry Cobbler 1/4" Sweater Trim - 14" long; 1-3/8" Circle Punch; Paper Trimmer

Cherry Cobbler Houndstooth Clutch Purse


If this little purse doesn't make you smile, I don't know what would!  When I saw it on Becky Roberts' blog, which is www.inkingidaho.blogspot.com, I melted and HAD to make one!  It is part of Becky's 2011 12 Days of Christmas tutorials that you can purchase.  It's so pretty and Christmasy and it was definitely a big hit at my "Busy Little Elves" Camp Wannastamp.  To get the template and the instructions, you will need to purchase them from Becky; otherwise, the supplies I used are listed below.  All supplies used and shown are from Stampin' Up!, with the exception of the Velcro circles.

Recipe:

Paper:  Cherry Cobbler; Silver Glimmer Paper; Whisper White scrap
Stamps:  Sweets for the Sweet
Ink:  Cherry Cobbler
Miscellaneous:  Purse Template; Paper Snips; Simply Scored Scoring Tool; Multipurpose Liquid Glue; 1/2" Circle Punch; Houndstooth Embossing Folder; Big Shot Machine; 1" Circle Punch; Stampin' Dimensionals; Velcro circles; White Organza Ribbon - 4" long; Cherry Cobbler Baker's Twine - 5" long (2)

Creative Elements/Trust God 2013 Calendar


When this time of year rolls around, we're all thinking about calendars for the new year!  I took the triple-time stamping technique card that my friend Dawn Olchefske designed and converted it into a calendar to keep on my desk all year long!  Thanks, Dawn - I'll think of you every time I glance at my calendar!  I offered this project at my "Busy Little Elves" Camp Wannastamp.  I think it makes a wonderful Christmas gift!  All supplies used and shown are from Stampin' Up!  The recipe is below.

Recipe:

Paper:  Early Espresso - 7-1/4 X 4-1/4; Early Espresso - 6-1/4 X 3-1/4; Early Espresso - 5-1/4 X 2-1/4; Whisper White - 7 X 4; Whisper White - 6 X 3; Whisper White - 5 X 2
Stamps:  Creative Elements; Trust God
Inks:  Crumb Cake; Early Espresso
Miscellaneous:  Desktop Display Calendar Case; SNAIL Adhesive; Stampin' Dimensionals; Stamp-a-ma-jig; Early Espresso Baker's Twine - 8" long; Scissors; 2013 Calendar (I ordered mine from www.stamponthis.com); Naturals Designer Buttons, Vintage Faceted Designer Buttons, or Brushed Bronze Designer Buttons (they all look awesome); Mini Glue Dots
 

Ornament Keepsakes Money Holder


Money holders are one of my favorite projects - especially Christmas money holders!  I saw a card like this created by Mindy Backes that I simply converted into a money holder - and I love how it turned out!  With the ink colors used, it has a retro feel to it - and I love using non-traditional colors for Christmas.  I offered this money holder at my "Busy Little Elves" Camp Wannastamp.  All supplies used and shown are from Stampin' Up!  The recipe is below.

Recipe:

Paper:  Whisper White - 8-1/2 X 7; scored at 2-3/8 and 5-1/2 on the 8-1/2 " side; Whisper White scrap for the ornament framelits; Silver Glimmer scrap
Stamps:  More Merry Messages; Ornament Keepsakes; Chock Full of Cheer (for the "to" and "from" on the inside)
Inks:  Real Red; Pool Party; Lucky Limeade
Miscellaneous:  Simply Scored Scoring Tool; Sticky Strip; Scissors; Stamp-a-ma-jig; Real Red 1/8" Taffeta Ribbon - 8" long (2); Pool Party Baker's Twine - 10" long; Mini Glue Dots; Ornament Keepsakes Framelits; Big Shot Machine; 1/4" Circle Punch; SNAIL Adhesive; Paper Piercer with Mat; Real Red Brad; Stampin' Dimensionals; 3/4" Circle Punch; Rhinestone Jewels; Pearl Jewels; Merry Minis Star Punch

Holiday Collection Framelit Card Sample


Isn't this a great card?  How fun to color in the negative image of the candy cane with ribbon!  This is a card I featured at my "Busy Little Elves" Camp Wannastamp.  I'm not sure who created the original version of this card to give proper credit to.  All supplies used and shown are from Stampin' Up!  The recipe is below:

Recipe:

Paper:  Crumb Cake - 11 X 4-1/4; Real Red - 5-1/4 X 4; Crumb Cake - 5-1/8 X 3-7/8; Old Olive scrap
Stamps:  More Merry Messages
Inks:  Early Espresso
Miscellaneous:  Stampin' Dimensionals; SNAIL Adhesive; Real Red 1/4" Stitched Grosgrain Ribbon - 1-1/2" long (4); Whisper White 1/4" Stitched Grosgrain Ribbon - 1-1/2" long (3); Holiday Collection Framelits; Bird Builder Punch; Scissors; Mini Glue Dots; Real Red Button; White Baker's Twine - 5" long

Sunday, October 7, 2012

Stampin' Up! Halloween Samplers

My stampin' buddies met this past Friday and Saturday to make Stampin' Up! Halloween samplers and we were absolutely thrilled with how nice they all turned out!  It didn't matter which background paper from the Howlstooth & Scaringbone Designer Series Paper we chose, they all looked wonderful behind nine spooky squares embellished for Halloween!  The samplers have become such a popular project with my customers, that Christmas samplers are now in the works and will be offered very soon!
 

Above is the sampler that I made.  I'm in love with it!  Four of the above squares were designed by members of The TOPICS! and the other five were my design.  Decorating and embellishing a little 1-3/8" square piece is challenging, but FUN!  Give it a try!


A close-up of the squares.


Here's another sampler above that I made using the Chevron background from the Howlstooth & Scaringbone Designer Series Paper. 


The sampler above was made by Alice Melchor.  I'm sharing the samplers that used different background pieces so you can pick your favorite.  It's difficult - they're all cute!

 
The sampler above was made by Kim Noska.  This background paper felt so warm and brought out all of the sampler colors so nicely! 


The sampler above was made by Margaret Digby.  I think the diagonal stripes look GREAT!


The sampler above was made by Geneen Lannom.  Can't go wrong with that Chevron background!


Oh, boy, look at this one!  The sampler above was made by Tiffany Doucette.  This looks so Halloweeny!  It's one of my favorite background pieces!

 
I'm in trouble with this one because I can't remember who made the sampler above, but the diagonal grid makes another great background and pulls out all of the colors so nicely!


I can't remember who made the above sampler, but I'm loving the background on this one, too!


The sampler above was made by Cindi Dimon.  As soon as I saw it, I knew I wanted this background piece for mine, too! 


The sampler above was made by Jeannie Godschalk.  You can NEVER go wrong with polka dots.  I think this is just adorable!
 
We had so much fun making our samplers!  Wish all of you could have been there!


Sunday, September 23, 2012

Googly Ghouls Card Sample


Isn't he sweet?  One of my favorite card designers is Debra Currier.  When I saw this card that she designed, I fell in love with it and wanted to offer it at my Hocus Pocus - a Halloween Focus Camp Wannastamp.  Her original design shows the mummy with a little red heart, which adds a nice pop of color - but hey, it's Halloween, and it's a mummy - I think he should have a BLACK heart!  Love this layout and it's such a fun little card to make!  All supplies used and shown are from Stampin' Up!  The recipe is below.  To order these fun products, visit my 24/7 online store at www.pennythomas.stampinup.net and click on "Shop Now."
Recipe:
Paper:  Sahara Sand - 11 X 4-1/4; Neutrals Collection Designer Series Paper Stacks (black) - 3 X 1-3/4; Basic Black - 3-1/2 X 2-1/4; Whisper White - 2-3/4 X 2; Sahara Sand - 1-1/2 X 1/2"; Whisper White scrap; Basic Black scrap
Stamps:  Teeny Tiny Wishes; Googly Ghouls
Inks:  Basic Black
Miscellaneous:  SNAIL Adhesive; Stampin' Dimensionals; Mini Glue Dots; 2-Way Glue Pen; Scallop Edge Border Punch; Paper Snips; Black Button; White Baker's Twine - 6" long; Scissors; Googlies; Owl Builder Punch (for the heart)

Affection Collection Card Sample


This beautiful card was designed by Penny Smiley!  Isn't that a cute name?  I have become very fond of banner cards - and the Petite Pennants Builder Punch makes it so easy!  I offered this card at my Hocus Pocus - A Halloween Focus Camp Wannastamp.  All supplies used and shown are from Stampin' Up!  If you'd like to order these wonderful supplies from me, just visit my 24/7 online store at www.pennythomas.stampinup.net and click on "Shop Now."  The recipe is below.
Recipe:
Paper:  Naturals Ivory - 8-1/2 X 5-1/2; Howlstooth & Scaringbone Designer Series Paper - 5-1/4 X 4; Naturals Ivory - 5 X 3-3/4; Howlstooth & Scaringbone Designer Series Paper - 1-3/4 X 1-3/4 (for the pennants); Naturals Ivory scrap
Stamps:  Affection Collection; Mixed Medley
Inks:  Tangerine Tango; Basic Black
Miscellaneous:  SNAIL Adhesive; Stampin' Dimensionals; Petite Pennants Builder Punch; Rhinestone Jewels; Paper Snips; Black Taffeta Ribbon -10" long (2); Mini Glue Dots; Scissors; Stamp-a-ma-jig; 3/4" Circle Punch

Spider Web Embossing Folder Card


What a luscious Halloween card!  I saw this wonderful card designed by Penny Smiley and knew immediately it would be PERFECT for my Hocus Pocus - A Halloween Focus Camp Wannastamp!  I love the colors and the ripply banners!  All supplies used and shown are from Stampin' Up!  The recipe is below.  To order these great products from me, just visit my 24/7 online store at www.pennythomas.stampinup.net and click on "Shop Now."
Recipe:
Paper:  Very Vanilla - 11 X 4-1/4; Basic Black - 5-1/2 X 4-1/4; Very Vanilla - 5-1/4 X 4-1/4; Howlstooth & Scaringbone Designer Series Paper - 4-1/2 X 1 (you'll need 2); Very Vanilla scrap
Stamps:  Tiny Tags
Inks:  Basic Black; Tangerine Tango
Miscellaneous:  SNAIL Adhesive; Finishing Touches Edgelits; Paper Cutter; Spider Web Embossing Folder; Big Shot Machine; Rhinestone Jewels; Paper Snips; Stamp-a-ma-jig; Jewelry Tag Punch; Stampin' Sponge; Paper Piercer with Mat; Very Vanilla Seam Binding Ribbon - 12" long; Mini Glue Dots; Linen Thread - 6" long; Scissors

Toxic Treats Card


WOW!  When classy meets Halloween, you've got an awesome card!  This card was designed by Kimberly Van Diepen - a good friend and someone I love and adore!  I offered this card at my Hocus Pocus - A Halloween Focus Camp Wannastamp.  All supplies used and shown are from Stampin' Up!.  To order these great products from me, visit my 24/7 online store at www.pennythomas.stampinup.net and click on "Shop Now."  The recipe is below.
Recipe:
Paper:  Very Vanilla - 8-1/2 X 5-1/2; Howlstooth & Scaringbone Designer Series Paper - 3-3/4 X 1 (you'll need three different patterns); Very Vanilla - 3-3/4 X 3; Tangerine Tango - 5 X 1/2"
Stamps:  Toxic Treats
Inks:  Basic Black
Miscellaneous:  SNAIL Adhesive; Paper Snips; Etruscan Wheel and Handle; Labels Collection Framelits; Stampin' Dimensionals; Stamp-a-ma-jig; Mini Glue Dots; Paper Piercer with Mat; Antique Brad

Frightening Feline Card


My friend Mary Fish designed this card.  Anything she designs, I ALWAYS love - including this one!  I knew it would be wonderful to offer at my Hocus Pocus - A Halloween Focus Camp Wannastamp and everyone loved it, OF COURSE!  How can you NOT love a Mary Fish card?  All supplies used and shown are from Stampin' Up!.  To order these products from me, visit my 24/7 online store at www.pennythomas.stampinup.net and click on "Shop Now."  The recipe is below.
Recipe:
Paper:  Basic Black - 8-1/2 X 5-1/2; Very Vanilla - 5-1/4 X 4; Howlstooth & Scaringbone Designer Series Paper - 5 X 3-3/4 (then cut it in half at 2-1/2" because the patterns are back-to-back); Tangerine Tango - 4 X 4; Basic Black - 3-1/2 X 3-1/2; Tangerine Tango scrap; Basic Black scrap; Very Vanilla - 5-1/4 X 4 (for the inside of the card)
Stamps:  Frightening Feline; Spooky Bingo Bits
Inks:  Versamark
Miscellaneous:  SNAIL Adhesive; 1/2" Striped Satin Ribbon - 11" long; Designer Ribbon Slide; 3-1/2" Circle Die; 3" Circle Die; Big Shot Machine; Embossing Buddy; Heat Tool; Tangerine Tango Embossing Powder; Stamp-a-ma-jig; Stampin' Dimensionals; 1-3/8" Circle Punch; 1-1/4" Circle Punch; Scissors

Perfectly Preserved Halloween Card


Here's an adorable card that I offered at my Hocus Pocus - A Halloween Focus Camp Wannastamp.  I saw a card similar to this that used different supplies than Stampin' Up!, so I used my Stampin' Up! supplies and ended up with this great card!  I think it turned out really cute!  To order these items from me, visit my 24/7 online store at www.pennythomas.stampinup.net and click on "Shop Now."  The recipe is below.
Recipe:
Paper:  Crumb Cake - 11 X 4-1/4; Crumb Cake - 5-1/2 X 4-1/4; Medium Window Sheet - 3 X 2-1/2; Early Espresso - 2-3/4 X 1/16"; Whisper White scrap.  For the candy corn:  Whisper White - 3/4 X 1/2; Tangerine Tango - 1/2 X 1/2; Daffodil Delight - 1/2 X 1/4
Stamps:  Perfectly Preserved; Googly Ghouls; Spooky Bingo Bits
Inks:  Tangerine Tango; Basic Black; Black Stazon
Miscellaneous:  SNAIL Adhesive; Argyle Embossing Folder; Big Shot Machine; Paper Snips; Stampin' Dimensionals; Googlies; Early Espresso Baker's Twine - 12" long; Naturals Designer Buttons; Ticket Duo Builder Punch; Linen Thread - 4" long; Mini Glue Dots; Cannery Set Framelits

Toxic Treats Trick-or-Treat Bag


I saw this classy trick-or-treat bag in the September issue of our Stampin' Success magazine.  It was a perfect addition to my Hocus Pocus - A Halloween Focus Camp Wannastamp!  All supplies used and shown are from Stampin' Up!, with the exception of the orange tissue paper.  To order these awesome products from me, visit my 24/7 online store at www.pennythomas.stampinup.net and click on "Shop Now."  The recipe is below.
Recipe:
Paper:  Natural Composition Specialty Designer Series Paper - 12 X 6 - score along the 12" side at 2-3/8, 3-3/4, 8-1/4 and 9-5/8.  Score along the 6" side at 1" across the bottom.  Silver Glimmer Paper - 3-1/2 X 3-1/2; Basic Black - 5-1/4 X 4-1/2; Brights Collection Designer Series Paper Stacks (Pumpkin Pie) - 2-3/4 X 1; Whisper White - 3-1/2 X 3; Whisper White - 3-1/2 X 1/2
Stamps:  Toxic Treats
Inks:  Basic Black; Pumpkin Pie
Miscellaneous:  Simply Scored Scoring Tool; Paper Snips; Sticky Strip; Stampin' Dimensionals; Floral Frames Framelits; Paper Doily Sizzlits; Paper Piercing Tool (to get out all of the little pieces from the Paper Doily); 1/2" Striped Satin Ribbon - 9" long (2 - for the handles); 1/2" Striped Satin Ribbon - 2-3/4" long; Labels Collection Framelits; Rhinestone Jewels; Stamp-a-ma-jig; and you'll also need orange tissue paper and goodies inside!

Petal Cone Die Witch's Hat


I can't believe all of the things you can make with our Petal Cone Die!  I have used it at my last three stamp camps - each time making something beautiful - and now, a witch's hat!  This is an item I offered at my Hocus Pocus - A Halloween Focus Camp Wannastamp.  With candy inside, it's the perfect Halloween treat container!  All supplies used and shown are from Stampin' Up!  To order these amazing products from me, visit my 24/7 online store at www.pennythomas.stampinup.net and click on "Shop Now."  The recipe is below.
Recipe:
Paper:  Basic Black - 7 X 5-1/2 (2); Basic Black - 5-1/4 X 5-1/4; Lucky Limeade - 2-3/4 X 3/4 (4); Silver Glimmer Paper scrap; Lucky Limeade - 3/4 X 3/4
Stamps:  Established Elegance
Inks:  Basic Black
Miscellaneous:  Petal Cone Die; Big Shot Machine; Spider Web Embossing Folder; Sticky Strip; Scissors; 1-3/8" Circle Punch; Stampin' Dimensionals; Rhinestone Jewels; Scallop Circle Die (for the rim of the hat)

Googly Ghouls Shaker Treat Container


I saw a cute sample of this mummy in a shaker frame with free-floating eyeballs all around him!  I thought it was so cute, but I put him on the front of one of our new Ghoulish Googlies Designer Kit bags.  With the kits containing the glassine bags, the googlies, and adorable little tags, it made this treat container a cinch!  I offered this project at my Hocus Pocus - A Halloween Focus Camp Wannastamp.  With candy corn inside, it's just so cute!  All supplies used and shown are from Stampin' Up!, with the exception of the free-floating googlies.  To order these great products from me, visit my 24/7 online store at www.pennythomas.stampinup.net and click on "Shop Now."  The recipe is below.
Recipe:
Paper:  Tangerine Tango scrap; Basic Black scrap; Medium Window Sheets - 2-1/2 X 2-1/2; Tags from the Ghoulish Googlies Designer Kit; Whisper White scrap; Whisper White - 2-1/2 X 2-1/2
Stamps:  Frightening Feline; Googly Ghouls
Inks:  Basic Black; Basic Black Marker
Miscellaneous:  Glassine bags from the Ghoulish Googlies Designer Kit; Shaker Frames (the largest one); 1-3/4" Circle Punch; 2-3/8" Scallop Circle Punch; Paper Snips; SNAIL Adhesive; 2-Way Glue Pen; Googlies; 5mm googlies without adhesive (8); Big Shot 2" Circle Die; Big Shot Machine

Monday, August 27, 2012

Autumn Accents Die Card


Here's a beautiful card that I copied from Ladybug Designs.  I wanted to offer this card at my "Falling in Love With Fall" Camp Wannastamp so my customers could try out several new products:  The Autumn Accents Die, the Woodgrain Embossing Folder, our Orchard Harvest Designer Series Paper, and our Naturals Designer Buttons!  I think it is a very pretty card and now I'm ready to bake some pumpkin pies!  The recipe is below.  If you'd like to order these products from me, you can visit my 24/7 online store at www.pennythomas.stampinup.net and click on "Shop Now."

Recipe:

Paper:  Crumb Cake - 11 X 4-1/4; Crumb Cake - 5-1/4 X 4; Early Espresso - 3-1/2 X 3-1/2; Cajun Craze - 2-1/2 X 2-1/2; More Mustard - 4 X 2-1/2; Orchard Harvest Designer Series Paper - 4 X 1-1/2
Stamps:  Teeny Tiny Wishes
Inks:  Early Espresso
Miscellaneous:  Stampin' Dimensionals; Big Shot Machine; Autumn Accents Die; Square Lattice Embossing Folder; Perfect Polka Dots Embossing Folder; Woodgrain Embossing Folder; SNAIL Adhesive; Stamp-a-ma-jig; Naturals Designer Buttons; Early Espresso Baker's Twine - 7" long; Mini Glue Dots; Scissors

Daydream Medallion Card


I saw this beautiful card on Pinterest, but when I tried to go back later to find out who the designer was, I couldn't find the card again!  Don't you hate it when that happens?  Someone else gets the credit for this gorgeous card, but I was happy to copy it!  The colors are perfect for fall, so I wanted to offer this card at my "Falling in Love With Fall" Camp Wannastamp.  I love working with medallions.  You can use any greeting inside of them - dress them up, make them cutesy, make them elegant or very simple!  Thanks to whoever designed this card and my apologies for not knowing who you are!  The recipe is below.  If you would like to order these products from me, visit my 24/7 online store at www.pennythomas.stampinup.net and click on "Shop Now."

Recipe:

Paper:  Crumb Cake - 8-1/2 X 5-1/2; Comfort Cafe Designer Series Paper - 5-1/2 X 1/2" (you'll need three different patterns); Very Vanilla - 4 X 4 (for the medallion); Cajun Craze scrap; Summer Starfruit scrap
Stamps:  Daydream Medallions; Friendly Phrases
Inks:  Soft Suede; Summer Starfruit
Miscellaneous:  Paper-Piercing Mat; Paper Piercing Tool; SNAIL Adhesive; Floral Frames Framelits; 1-3/8" Circle Punch; 1-3/4" Circle Punch; Pearl Jewels; Paper Snips; Stampin' Dimensionals; Linen Thread - 36" long; Stamp-a-ma-jig; Fancy Fan Embossing Folder; Big Shot Machine

Wonderfall Vintage Acorn Treat Container


Here's a nice fall vintage treat container for you!  Anything that holds a Ghirardelli chocolate square is #1 in my book!  I enjoyed using the Autumn Accents Die to cut out the acorn from the Wonderfall stamp set!  It made this project so quick and easy!  The recipe is below.  To order these products from me, visit my 24/7 online store at www.pennythomas.stampinup.net and click on "Shop Now."

Recipe:

Paper:  Naturals Ivory - 5-1/4 X 4-1/2; Early Espresso scrap; Soft Suede scrap; Naturals Ivory scrap
Stamps:  Wonderfall; Lovely Little Labels
Inks:  Early Espresso Marker; Soft Suede; Early Espresso
Miscellaneous:  Big Shot Machine; Scallop Envelope Die; Lacy Brocade Embossing Folder; SNAIL Adhesive; Victoria Crochet Trim - 7" long; Scissors; Extra Large Oval Punch; 1-3/8" Circle Punch; 1-1/4" Circle Punch; Stampin' Dimensionals; Pearl Jewels or Neutrals Brads; Paper Snips; Paper Piercer with Mat; Autumn Accents Die; Stampin' Sponges; Stamp-a-ma-jig; Ghirardelli chocolate square

Day of Gratitude Card


Isn't this card designed by Jennifer Timko exquisite?  As soon as I saw it, I wanted to offer it at my "Falling in Love With Fall" Camp Wannastamp.  This is why I love fall stamping so much!  The colors are rich and deep and you can just feel the fall season coming up!  The recipe is below.  If you'd like to order these products from me, you can visit my 24/7 online store at www.pennythomas.stampinup.net and click on "Shop Now."

Recipe:

Paper:  Early Espresso - 11 X 4-1/4; Early Espresso - 5-1/2 X 4-1/4 (I cut the embossed piece this size first, run it through the Square Lattice Embossing Folder, and THEN cut it to 5-1/4 X 4); Early Espresso - 4 X 4 (for the medallion); Very Vanilla scrap for the leaves; Very Vanilla - 3-1/2 X 1/2" (for the greeting); Very Vanilla - 5-1/4 X 4 (for the inside of the card)
Stamps:  Day of Gratitude; Sweet Essentials
Inks:  Early Espresso; Crumb Cake; Cajun Craze
Miscellaneous:  SNAIL Adhesive; Big Shot Machine; Square Lattice Embossing Folder; Paper Snips; Stampin' Dimensionals; Early Espresso button; Linen Thread - 3" long; Mini Glue Dots; Stamp-a-ma-jig

Little Leaves Sizzlits Card


For the Founder's Circle trip next month, I signed up to be part of a "party ready" card swap.  The guidelines are to pick a simple card with three layers that would be a quick and easy workshop card.  Below is the design that I came up with.  It's a quick and easy card to put together, but it's also elegant and "party ready."  I also offered this card at my "Falling in Love With Fall" Camp Wannastamp.  The recipe is below.  If you'd like to order these products from me, you can visit my 24/7 online store at www.pennythomas.stampinup.net and click on "Shop Now." 

Recipe:

Paper:  Very Vanilla - 11 X 4-1/4; 5-1/2 X 4-1/4 (I like to cut this piece to this size, run it through the Square Lattice Embossing Folder, and THEN cut it down to 5-1/4 X 4); 4-1/2 X 3-1/4; 2-1/2 X 2-1/2 (for the Little Leaves Sizzlits Die)
Stamps:  Apothecary Art
Inks:  Soft Suede
Miscellaneous:  Stampin' Dimensionals; Little Leaves Sizzlits Die; Big Shot Machine; Square Lattice Embossing Folder; Mini Glue Dots; Stamp-a-ma-jig; Pearl Jewels; Paper Snips

French Foliage and Summer Silhouettes Card


I saw a beautiful card that was designed by Layne Willison, but I didn't have the stamps she used, so I compromised and made her card with what I had available.  I loved the results!  I offered this card at my "Falling in Love With Fall" Camp Wannastamp.  The recipe is below.  If you would like to order these products from me, you can visit my 24/7 online store at www.pennythomas.stampinup.net and click on "Shop Now."

Recipe:

Paper:  Sahara Sand - 11 X 4-1/4; Very Vanilla - 2-1/2 X 2-12 (for the Labels Collection Framelits)
Stamps:  French Foliage; Summer Silhouettes; Day of Gratitude
Inks:  Early Espresso; Old Olive, Always Artichoke Marker
Miscellaneous:  Stamp-a-ma-jig; Vintage Trinkets; Mini Glue Dots; Craft and Rubber Scissors (to cut off the metal prongs on the Vintage Trinkets buttons); Labels Collection Framelits; Stampin' Dimensionals; Victoria Lace Trim - 3" long; Scissors

Spice Cake Fabric Paper Snips Holder


When we attended the convention this past summer, this is one of the projects they shared with us - a SUPER no-sew fabric project!  I am excited to use our fabric without sewing because me and my sewing machine don't have the greatest relationship!  Using the Spice Cake Designer Fabric with our new Brushed Bronze Designer Buttons makes a great combo for a fall project.  Wouldn't this idea be cute using our Candlelight Christmas Designer Fabric and putting candy canes in the pocket?  Or how about our Orchard Harvest Designer Fabric and putting pencils in the pocket for a great back-to-school teacher gift?  This project is super-easy, too!  It uses the Petal Cone Die and some Sticky Strip and you're done!  The recipe is below.  To order these great products from me, visit my 24/7 online store at www.pennythomas.stampinup.net and click on "Shop Now."

Recipe:

Paper:  Cardboard Template - 6-1/2 X 5-3/4 (this is the size of the Petal Cone Die)  I lay out my fabric, trace around the cardboard template, and cut out the squares
Stamps:  None
Inks:  None
Miscellaneous:  Spice Cake Designer Fabric; Big Shot Fabric Adhesive Roll; iron; Big Shot Machine; Petal Cone Die; Sticky Strip; Scissors; Brushed Bronze Designer Buttons; Linen Thread - 7" long; Crystal Effects (to glue the button to the pocket)

Saturday, August 11, 2012

Stampin' Up! Convention 2012

Every July we converge on Salt Lake City, Utah, for the Stampin' Up! Annual Convention!  This year The TOPICS! had 13 members who attended - AND WE HAD A BLAST!  Below is a picture of some of us enjoying a meal together at Changs.  Starting from the left is Matt Bradshaw, Linda Bradshaw, Margaret Digby, Debbie Riches, Leslie Carmon, Pam D'Urso, me, Kirsteen Gill, and Tammy Davis.  I am so lucky to have an AMAZING downline - and they are good friends, too!


Below is a picture of Matt and Linda Bradshaw just returning from a tour of the Riverton Campus, the home offices of Stampin' Up!


Aren't these great-looking gals below?  I heard they had a wonderful time touring the Riverton Campus!  I'm sure the bus ride there and back was an absolute HOOT!  Starting way in the back is Amy Cato, Candice Marcella, Margaret Digby, Leslie Carmon, Kirsteen Gill, and Debbie Riches.  They must have all decided to wear red that day!


Below is Margaret Digby, checking in and getting her supplies for the week!  That great-looking bag was filled with stamping goodies and things we'd need for our week at the convention.  It was a perfect place to store all of our "stuff" in!  Margaret looks happy!


Below is Amy Cato, Candice Marcella, Debbie Riches, and Kirsteen Gill checking in to get their bags.


Below is Leslie Carmon and Pam D'Urso checking in for the convention!  Pam is my sister, can you tell?


Below is Lizette Lobpries, checking in to get her special convention bag, too!


Ahhh, my favorite people!  Below, starting from the left, is Kirsteen Gill, Leslie Carmon, Margaret Digby, Candice Marcella, Amy Cato, Matt Bradshaw, Linda Bradshaw, and me!  I think we were waiting in line to get into Memento Mall, our favorite place to shop during the convention!


Below is Sally Nusbaum and my sister, Pam D'Urso.  I believe they got a special pin for their recruiting efforts last year!  WAY TO GO!


Below is Kirsteen, proudly showing off her special recruiting pin!  WE'RE PROUD OF YOU, KIRSTEEN!


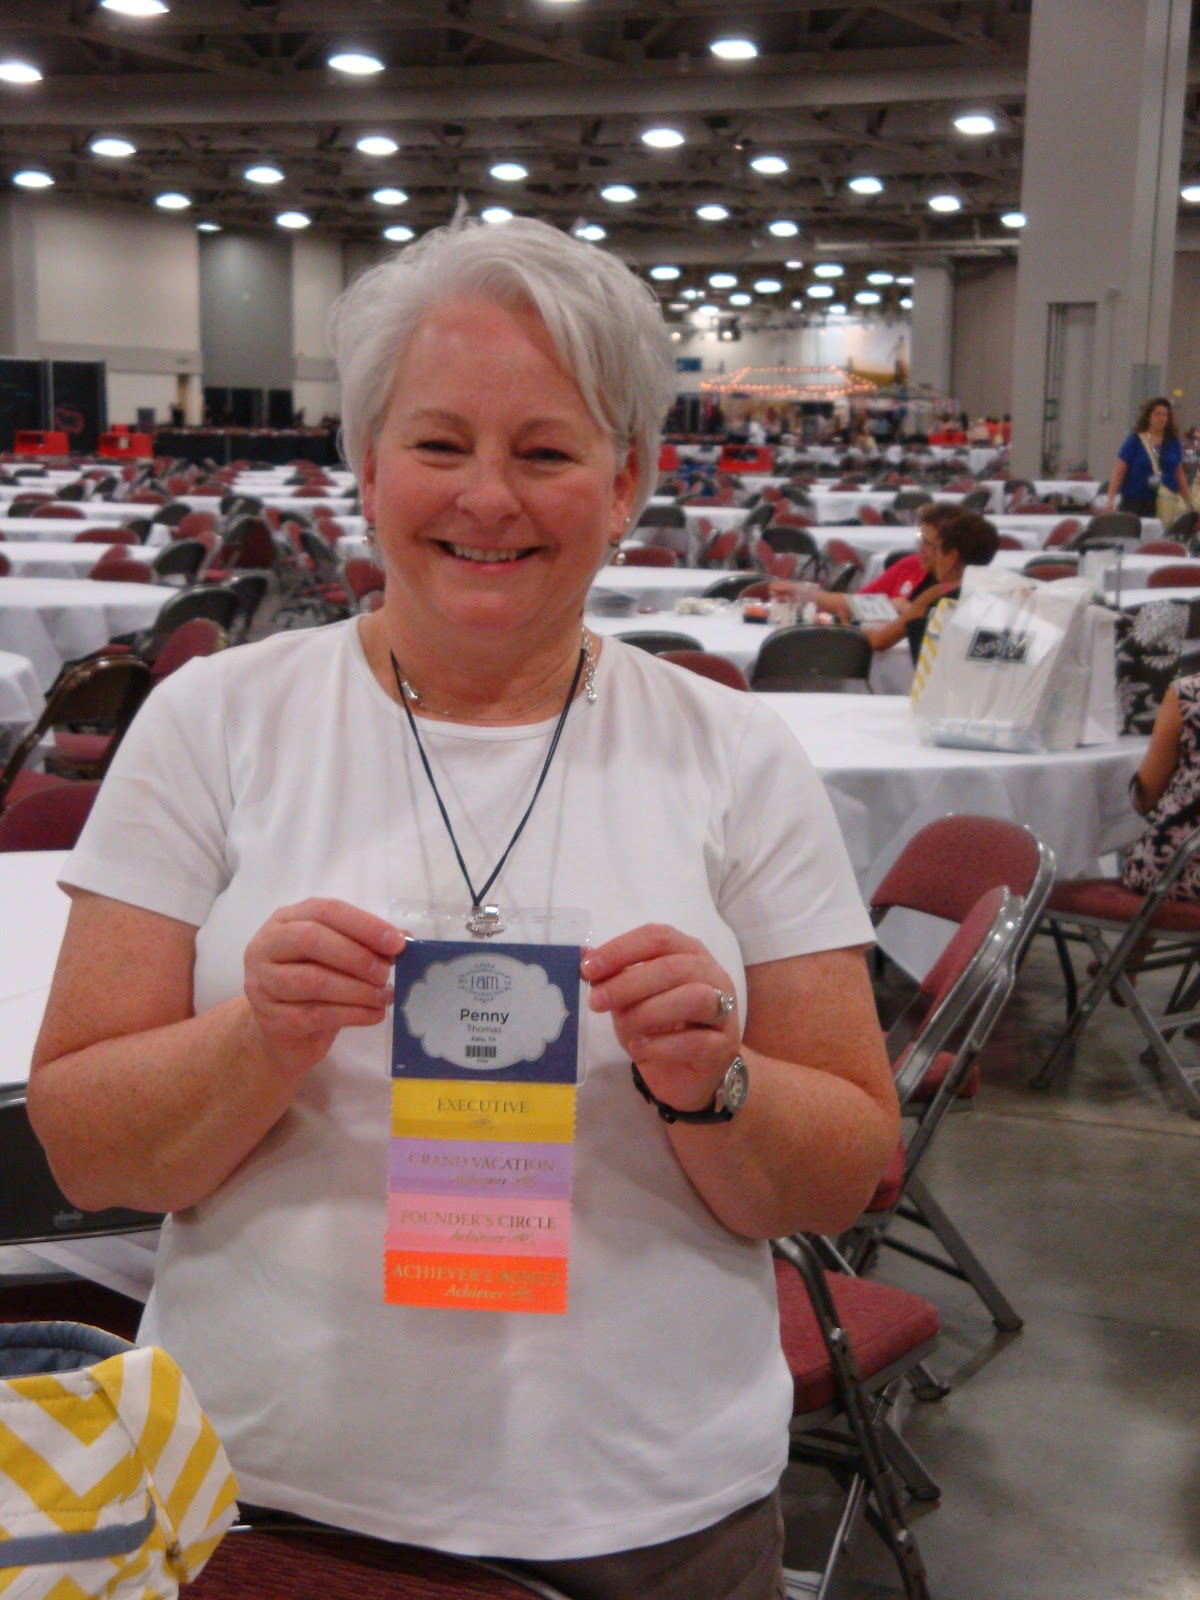
Here I am below so excited to learn that I earned Founder's Circle again!  I'll get to take a special trip to St. George, Utah, next month!  I LOVE THAT TRIP!  Couldn't have done it on my own - my fabulous customers and my amazing downline helped me earn that trip!  THANK YOU, EVERYBODY!


Here we are below in one of the general sessions of the convention!  There were so many of us, we took up two rows!  It was so much fun.  I can't wait for next year's convention - Stampin' Up!'s 25th anniversary convention!


Matt and Linda Bradshaw drew quite a bit of attention with their fabulous dancing!  I didn't know they were ballroom dancers!  They looked great swirling and twirling to the music!  It was so much fun to watch them - and everyone else enjoyed watching, too!


Below is my sister, Pam D'Urso, and Kirsteen Gill walking across the stage to be recognized for their leadership skills!  They had two or three promotions to Supervisor in their first-level downline!  WOO HOO!  YOU GALS ROCK!


Here is Margaret Digby, who just won a prize from Prize Patrol!  Oh, my gosh, look at that face!  Margaret is glowing and couldn't be happier!  I'm so glad she won a prize!


Below is Candice Marcella, walking across the stage as a new recruit!  Candice is a go-getter and is motivated, driven, and on fire!  I know we will see Candice on stage again and again!  MORE POWER TO YA', CANDICE!  The world is yours, my friend - GO GET IT!


Below is another shot of our group waiting for the General Session to start!  I'm already getting excited about next year's convention!  There's an energy unlike anything else when thousands of demonstrators are together!


Below is Debbie Riches, who just won a prize from Prize Patrol!  She looks extremely happy, doesn't she?  Prize Patrol has a way of doing that for you!


Here we all are jumping, cheering, and screaming!  Stampin' Up! gave EVERYBODY a free stamp set, the cute Ronald-McDonald set!  Free stamps always gets everybody celebrating! 


Below is Lizette Lobpries and Tammy Davis, deliriously happy!  They are on a "free stamp set" high!  I think they are glowing!


Here's the whole group after the convention was over!  We posed in front of the "I am" stage!  The convention theme was all about doing Stampin' Up! your way!


On the last night of the convention, I treated my group to dinner at Bucca di Beppo.  We got to sit in the Pope's Room - and here he is!  We had a wonderful evening together!  The food was delicious and the company was divine.  It was a great way to end the convention.


Thanks to all of my downline who attended the convention!  You made this year's trip extra-special.  I'm crazy about each one of you and I'm so appreciative of all you do!